Beta Alp 4.0

A collection of information as it arises. There's not a lot out there!

Friday, June 30, 2006

Anti-tamper

As I'll be likely to be leaving the Alp outside youth hostels and hotels I was a little concerned that idle hands might investigate the quick-release seat. I fabricated a 'guard' from 3mm lexan that fits under the rack mounting bolts. There was already this much space as it's not a perfect fit and normally springs down.


Now someone, including me, needs a 8mmWAF spanner to get under the seat. My current toolset isn't there.

Sunday, June 25, 2006

Testing...1, 2, 3...

I changed the brake fluid in both front and rear systems. It's often said that it should be done annually as the fluid is hygroscopic; I don't think I've ever managed that. The fluid was distinctly discoloured and there were sediments in the reservoirs. Whenever I do this job I'm always slightly concerned whether I'll end up introducing air bubbles and making the brakes worse. No problems did occur.

After all of these interventions a test ride seemed sensible and so I took a little trip along some local roads and byways - being careful to stay on ones that I believe are legal after the recent NERC restrictions. The new higher bars are definately an improvement and everything else worked fine. Perhaps I should check if the steering head beraings have bedded in? The TKC80 tyres were at a road pressure of 28psi. On raod they were fine although at one point I did feel a tiny slip and for most of the dry stony tracks I didn't have a problem. On one particular steep lane that has been covered in very fine grit by the council road crew I did find that the rear tyre lost traction and fish tailed a bit as I ascended in second gear. That isn't soeething I'm used to but coped fine.

Friday, June 23, 2006

Number plate refit

In the UK there we don't get registration plates issued by an official authority. The vehicle gets its number when first registered and you get plates made up to an official standard. In theory these should be done on British Standard materials and to a specific size, which for a motorcycle seems to be huge. One of contemporary the reasons for this standard is to facilitate the use of number plate recognition systems for the issuing of fines and toll collection. Also the plates have to be made by an apporved company so as to reduce the chance that someone accidentally puts the wrong number on their car...Anyway, I decided I needed a legal-size plate including the 'GB' logo in a 'Euroband'.

This blog entry is to promote a compnay that can be found on 01995 602513 that at the time of writing will produce flexible 'show plates' for £12-50. Order today, delivered tomorrow. Excellent service. The material looks normal but is fairly flexible unlike the legal acrylic which is incredibly brittle and totally unsuited to a motorcycle used on unsurfaced roads.

Monday, June 19, 2006

High bars

Over the years I've sometimes wondered if I needed higher bars on a few of my dirt bikes as I always seem to have a reach to them. Now I've fitted some Renthal Dakar/Enduro High (pattern #613) bars to the Alp. These give around 60mm more height and a bit more sweep than the original bars.

The cables are adequately long - the clutch only just - so bear this in mind if you're planning to fit some sort of bar risers.

As the OE bars are around 800mm end-to-end I cut 15mm off each end.

In the UK I always order Renthal products from B&C express as they are very efficient.

Naturally it took quite a while to transfer the controls and brush guards.

Only time will tell if they are more ergonomic.

Thursday, June 15, 2006

Steering bearings

I'd a belief that the steering bearings were very slightly loose as they had a subtle knock and the bars 'fell' very easily when the bike was on a stand. I also wondered if they had been greased at the factory, and from my experience with a BMW F650 there is always the worry that the heat from the oil reservoir makes the grease run away.

Hold it up securely

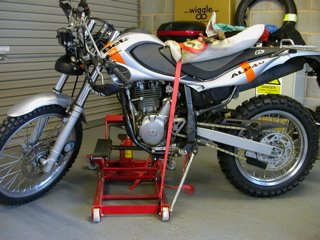
The handbook summarises the tightening procedure but I wanted to do more. I put the bike on a lift and held it in position with a ratchet strap. First was too loosen the triple clamp bolts (10mm WAF) and then undo the handlebar clamp bolts (6mm WAF Allen). The front instrument/lamp support must come off too. With the headlamp nacelle removed (10mm WAF) it's easy to get a socket on an extension to the 3 retaining bolts (8mm WAF). Try not to let things dangle on the wires, but that is easier said than done.

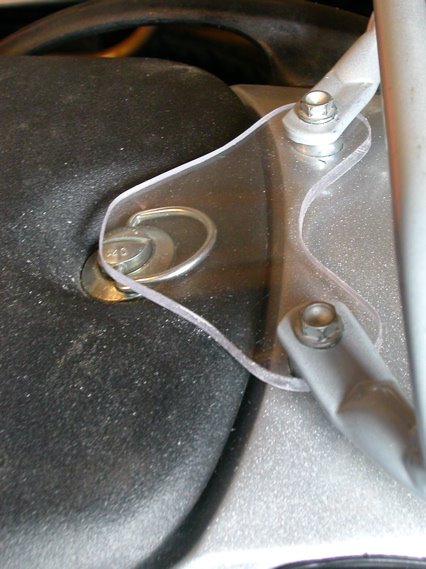
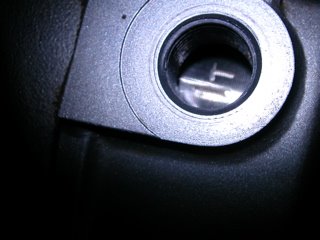
Then remove the rubber bung from the steering centre and with a 30mm WAF socket (ideally a 6 sided one) undo and remove the thin nut. Then with a length of softwood and a hammer it is easy to gently knock the upper triple clamp off the forks. Underneath is the adjuster nut. This nut was loose which suggests to me that the bearings were loose too. Remove the nut, protective cover and washer.

The various nuts and washers

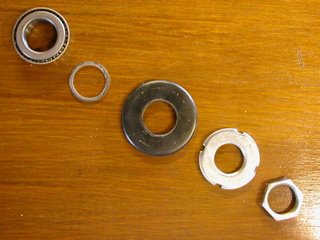
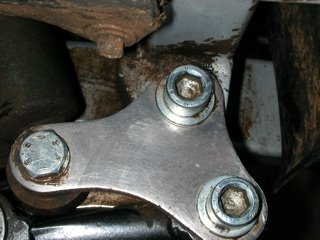
With the front wheel an inch off the ground gently tap the steering bar downwards with a hammer via a piece of softwood. This knocks the upper taper bearing off. Eventually the wheel will touch the floor, the lower bearing will be exposed and the upper bearing free. All the bits were pleasantly clean and lightly greased with no signs of damage to the bearing races. Everything can then be cleaned and regreased with a high melting point chassis grease.

Reassembly is the reverse process after cleaning everything and adding a dot of copper grease to everything; but two things to be aware of.
1. The triple clamp bolts shouldn't be tightened fully until you've bounced the folrks up and down a bit to align the fork tubs.
2. Tighten the adjustment nut until the bearings feel a little too tight. With the bars on the extra leverage usually makes the assembly swing more freely.

Check brakes, lights etc...

I was a bit disappointed that there aren't any protective seals or such in this assembly, but the upside of that is that they are off the shelf bearings and thus cheap to replace.

Monday, June 12, 2006

Oil change

I took a quick spin for 10km from home to get the engine really nice and warm. On a short stretch of open road I managed to reach 60mph and I think the front wheel balance is improved now I've fitted 50g of weights opposite the rim lock.

Anyway with nice hot oil it poured out very rapidly, dark but no visible particles. Likewise the oil filter - that's good. Refilling was a little of a concern: I put in 1.8 litres but after a minute of engine running it didn't reach the dipstick. Added another few hundred mls and then ran the engine for the official 5 minutes and it was part way up the stick. Another 100mls brought it to the 'max'. On checking the handbook says that 2.1 litres is needed after oil filter chnage - so spot on!

Sunday, June 11, 2006

Check valve clearances and a few observations

This is the first time I've checked the valves on this machine. It's quite a big job to take off the front body panels and the tank; follow the instructions in the handbook. However they don't mention that there is a retaining point in the middle. It just clips on and off once you know it's there.

A body panel retaining clip

Whilst the tank was off I also noticed that the carb full-open-butterfly switch was clearly disconnected.

The carb switch

The socket was even taped into a position to make it impossible to connect!

The carb switch connector

From a DR350 website it seems that this is some sort of power/rev limiter. Maybe it's disconnected at the factory?

Anyway, to the valves. These are under the usual bolt-retained (10mmWAF) inspection covers. This area was pretty dirty so i washed it down and left it to dry before opening up the covers.

The cylinder head

Inside are the usual tappets, exhaust to the front, inlet to the rear. The handbook states:
inlet: 0.05mm to 0.10mm
exhaust 0.8mm to 0.13 mm but I'm sure they mean 0.08 to 0.13mm!
The engine can be rotated to TDC on compression with a 19mm WAF socket or offset ring key. Note that this isn't in the toolkit, likewise there isn't a 17mm even though it's needed for the oil change. Through the front inspection cover a 'T' appears which seems to correlate with TDC as judged by poking something down the plug hole.

TDC marker I assume

As luck would have it my valve clearances were at 0.10mm and 0.12mm the top end of the tolerance. I prefer loose to tight on an air colled engine, but a bit noisy than binding!

Then everything was reassembled and the airfilter wshed, dried and reoiled.

Tuesday, June 06, 2006

Split link nightmare

I decided a new chain (520x112 links) was advisable as the OE one had lengthened a very litle and was incredibly dirty from a few trials. The sprockets looked perfect, even the rear alloy one so I chose, perhaps unwisely, to leave these. Rather, I refitted the OE 15 tooth front sprocket that had done a clean 1500km.

The problem came with the split link. it took numerous attempts with 3 pairs of pliers to get it too seat until all of a sudden it was one. Maybe I was too tired to be messing. Does anyone make a set of pliers for thsi job or perhaps I could grind some down for the job?

Sunday, June 04, 2006

More tyre changes

In preparation for a longish trip I replaced the MT43 trials tyres with Continental's TKC80s. These are supposedly hard wearing and being designed for bike machines such as the BMW R1100GS they should cope with the demands palced upon them by a mere Beta Alp 350.

Compare MT43 and TKC80

The tread is fairly open but puts more rubber on the road than the OE Karoos which should help longevity. The compound felt fairly soft to my thumb - I hope they aren't too soft!

I'd been told that the difficulty with changing tyres on the rear rim is that it has a ridge. Now I've seen it and could work round it. The trick seems to be to use a lever to push the bead over the ridge and into the hellow to assist breaking the bead. Likewise when refitting i made an effort to keep the bead below the ridge on the side opposite where I was levering. I think it worked. The sunny weather would have helped too. (It was too good to be working really but I know to take advantage of heat to fit tyres.)

While the wheel was out I decided to strip and grease the suspension linkage.

The linkage

It was pretty easy to dismantle - it's important to loosen the shock bolt first so it doesn't move around. I used a luggage strap between the swingarm and grab handle to support the swingarm. I was surprised to find that all but the shock joints are needle rollers. I wasn't surprised to find a lack of grease.