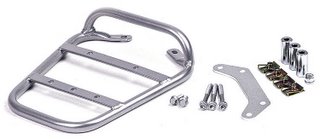
Rack
Soon after buying the Alp I ordered the Beta carry rack (part # 20.08236) as I don't like carrying tools and such in a rucsac on my back. I was a little disappointed to find that fitting required the 'fender' to be drilled and suspected the job would take some time. The kit looked quite well finished, although a little expensive at £70 by the time I'd had it posted home.
This week, over the course of a few evenings I have fitted it and here's what I found.
The first step is to remove the lifting handles and the rear mudguard, or fender as it's labelled in the instructions.
A steel bracket was readily fitted between two mounting points to provide the mountings for the rack. This fitted well. The spring clip mounted nuts seated with the use of a fair bit of force, and I lightly greased the metal to ease them and reduce the amount of paint scraped off.

The instructions then required 3 15mm holes to be drilled in the plastic. The fundamental problem was that the cutting template provided in the kit could be fitted onto the plastic in many locations, with a fair range of movement. It also appeared to be asymmetric even though the subframe is symmetrical. Measure twice cut once!
After much deliberation I decided to draw through the subframe to mark the rearmost point on masking tape stuck inside the guard. I then drilled that point out in stages to 6mm. When I checked with a bolt I decided the hole was a little too far back so filled it forwards. I then used this mark to locate the template and then marked the other two holes, even to the extent of marking a rangeof places where the centre could be.

With a little trepidation I drilled these to 6mm and tried bolts in the hole. Although the bolt looks quite straight in this picture is was in fact binding, suggesting that the hole was off-centre.

I then enlarged the holes a little, maybe to 8mm using a rat-tail file to try to centralise the bolt and remove areas that were binding. The idea was to use the bolt mountings as a sort of jig. Once this was achieved I placed a piece of 6mm studding in the holes and slotted the spacer onto the studding. It was then quite easy to draw around the spacer onto the plastic. Actually I drew on masking tape!

From then on it was a matter of gently filling the holes out to the line, testing with the spacer and occasionally refitting the plastic and repeating the fitting. As the spacers are 13.3mm diameter this should give a betterfit than drilling a 15mm hole. Naturally the longer you spend the closer you'll get it. Itook a few hours to get to this stage and was fairly happy with it:
After that it was a simple matter to clean up and fit the carier.

It looks pretty neat now, although having seen the kit I could now make one from scratch without too much trouble. I am thinking that the mounting points may serve as rear fixings for a pannier system...
posted by Adrian @ 9:38 pm
![]()

1 Comments:
Hi, nice little report.
Do you happen to have the instructions for it? Mine didn't come with anything, and I can't really find anything on the BETA website either. Cheers
Post a Comment
<< Home